Update: This tutorial is now on learn.pimoroni.com, but below is a brief version of it, showing you how you can set up the software and wire it all up.
Here, you’ll learn how to combine a couple of different output devices with the capacitative touch buttons on the Pimoroni Explorer HAT/Explorer HAT Pro, to create a fun little PIN entry system that will flash LEDs and buzz a buzzer when a correct/incorrect code is entered.
We’ll see how to connect up and control LEDs using the Explorer HAT outputs and a little piezo buzzer using the PWM (pulse width modulation) channel of the Raspberry Pi that’s broken out on the Explorer HAT.
Here’s what you’ll need:
- A Raspberry Pi A+/B+/2
- Pimoroni Explorer HAT/Explorer HAT Pro
- A handful of 470 Ω resistors (at least three)
- A couple of coloured 5mm LEDs (ideally green and red)
- A piezo electric buzzer
- A bunch of jumper leads
Note that you can get all of these components in the Explorer HAT Pro parts kit.
And here it is in action:
Getting the software set up
If your Explorer HAT/Explorer HAT Pro isn’t set up yet, you’ll need to do the following:
curl get.pimoroni.com/i2c | bash
sudo apt-get install python-smbus
sudo apt-get install python-pip
sudo pip install explorerhat
Those commands will install set up I2C and install the Explorer HAT Python library.
Next, you’ll want to plug your Explorer HAT into the 40 pin GPIO connector on your Raspberry Pi. You can check it’s working by typing the following straight in the terminal:
sudo python -c 'import time, explorerhat; explorerhat.light.on(); time.sleep(1); explorerhat.light.off()'
That should light up all four of the LEDs on the Explorer HAT board for a second and then switch them all off again. If that works, then your Explorer HAT is good to go!
Connecting the components up
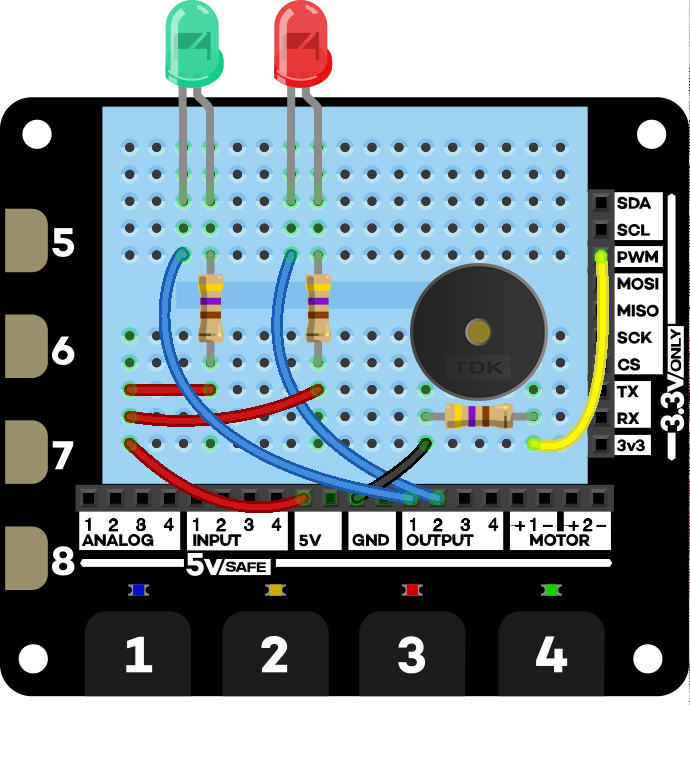
The wiring diagram is shown below.
Make sure that you connect the LEDs up the right way round, with the long leg - the anode - connected via the resistor to the 5V supply and the shorter leg connected to the output channel. The resistors connected to the LEDs are voltage-limiting resistors and reduce the 5V supply to a safe voltage for the LEDs. The piezo buzzer and the resistors can be connected up any which way you’d like.
The code
Here’s some pseudo-code describing what we need to do:
- Set a four digit PIN code
- Keep track of the button numbers pressed
- Give some visual feedback when the buttons are pressed
- When four numbers have been entered, check whether the PIN is correct
- If the PIN is correct, blink the green LED and play a high tone on the buzzer
- If the PIN is incorrect, blink the red LED and play a low tone on the buzzer
- Whenever four digits have been entered, wipe the list of entered digits clean
- Print out some feedback to the terminal
You can clone my fork of the Pimoroni Explorer HAT Python library which includes the code below for the PIN entry system, and you can have a look through it and try to understand what’s going on.
Here’s how to clone and run the code:
git clone https://github.com/sandyjmacdonald/explorer-hat.git
cd explorer-hat/examples
sudo python pin_entry.py
And here’s the code in full:
## Imports, for time delays, controlling Explorer HAT and GPIO pin 18
## for the piezo buzzer.

import time
import explorerhat as eh
import RPi.GPIO as GPIO

## Sets up GPIO pin 18 as a PWM output with freq. of 400 Hz.

GPIO.setmode(GPIO.BCM)
GPIO.setup(18, GPIO.OUT)
buzzer = GPIO.PWM(18, 400)

## Lists for the correct PIN and an empty one to add digits to.

correct_pin = [1,2,3,4]
pin = []

## Function to add a digit pressed on EHP cap. touch to our pin list.

def add_to_pin(channel, event):
        if channel > 4:  ## Only use channels 1-4
                return
        if event == 'press':
                global pin
                pin.append(channel)
                eh.light[channel-1].on()  ## Blink the corresponding LED
                time.sleep(0.05)
                eh.light[channel-1].off()

## We use a try, except, finally to run our code and catch exceptions.

try:

        ## The while True loop keeps the program running until control-c breaks out.

        while True:
                while len(pin) < 4:  ## Keeping adding until 4 digits added
                        eh.touch.pressed(add_to_pin)
                        time.sleep(0.05)
                if pin == correct_pin:  ## Runs with correct PIN
                        print 'PIN correct!'
                        for i in range(5):  ## Blinks LEDs and buzzes 5 times
                                buzzer.ChangeFrequency(400)  ## High frequency
                                buzzer.start(50)
                                eh.output.one.on()  ## Turns green LED on
                                time.sleep(0.1)
                                buzzer.stop()
                                eh.output.one.off()  ## Turns green LED off
                                time.sleep(0.1)
                else:  ## Runs with incorrect PIN
                        print 'PIN incorrect! Try again.'
                        for i in range(5):  ## Similar to previous block
                                buzzer.ChangeFrequency(50)  ## Low frequency
                                buzzer.start(50)
                                eh.output.two.on()  ## Turns red LED on
                                time.sleep(0.1)
                                buzzer.stop()
                                eh.output.two.off()  ## Turns red LED off
                                time.sleep(0.1)
                pin = []  ## Resets the list after 4 digits have been entered

## Catches control-c.

except KeyboardInterrupt:
        pass

## Catches any other exceptions.

except Exception:
        pass

## Clean up GPIO before exit.

finally:
        GPIO.cleanup()
The full version of the tutorial explains in detail about how the code works, so I won’t go into detail here.
Going further
I can think of loads of ways to make this better.
You could make it so that you can enter a PIN at the terminal when the program first runs, rather than having to set it within the code.
You could limit the user to a certain number of tries before they get locked out.
You could use this as a way to trigger something else, e.g. a tweet, a status update on Facebook, or send an email. Each user could have their own PIN that would trigger an event specific to that user.
GO FORTH AND HACK, INTREPID EXPLORER!