A few days ago, I tweeted a Vine clip showing the Pimoroni Unicorn HAT LED matrix being controlled with the Skywriter HAT. Well, the Pimoroni guys retweeted it and then asked if I would write up how I’d done it. I’ll try to explain it all, with what you’ll need, how to connect everything up, install the software, and how the code works.
Here’s what it looks like in action.
Here goes with the tutorial. It might get long.
I <3 Pimoroni
I have a bit of a man crush for Pimoroni. Their recent HATs (Hardware Attached on Top) for the Raspberry Pis A+ and B+ are just beautiful. They really nailed every detail of them, from the gorgeous matte black PCBs down to the product names, the typography and images on the PCBs and the libraries they provide on GitHub to control the HATs.
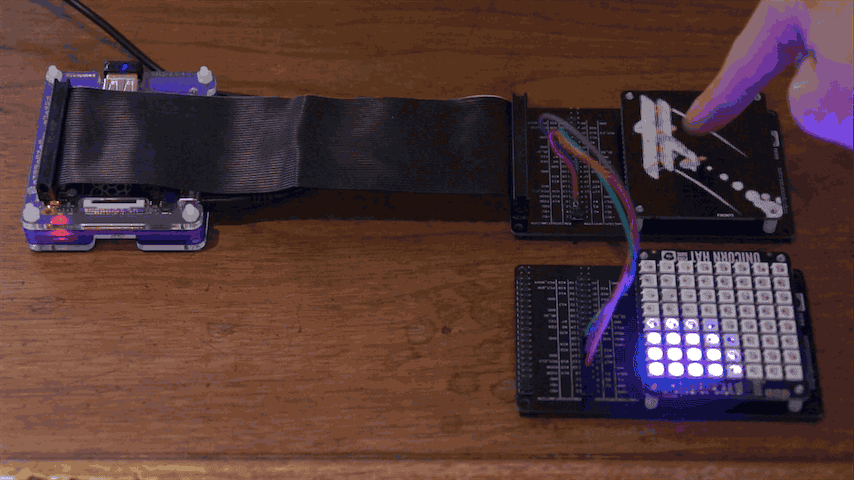
When Pimoroni brought out their 8x8 neopixel LED matrix, the Unicorn HAT , I hacked together a short Python script that would blink a spot on and off, and then when they brought out their 3D gesture-sensing addon, the Skywriter HAT, it occurred to me that I could use it to control the Unicorn HAT. The only problem being, how could I connect both HATs at the same time? Enter the Black HAT Hack3r.
The Black HAT Hack3r is another Pimoroni product that allows you to mount a HAT separately to your Raspberry Pi via a ribbon cable but still access all 40 of the GPIO pins for whatever purpose you wish. With two Black HAT Hack3rs you have the perfect way to link two HATs at the same time to your Raspberry Pi.
What you’ll need
- A Raspberry Pi A+ or B+ with 5v power supply
- At least one Black HAT Hack3r (BHH from here on in)
- A Unicorn HAT
- A Skywriter HAT
- A few female-to-female jumper wires
- A finger
Installing the software
First, you should run a sudo apt-get update and sudo apt-get upgrade to
make sure that everything is up-to-date on your Raspberry Pi operating system.
Next, you’ll need to install the libraries for the Unicorn HAT and Skywriter HAT. There are various ways to do this.
Unicorn HAT
For the Unicorn HAT you can either:
sudo pip install unicornhat
or
git clone https://github.com/pimoroni/unicorn-hat.git
and then
cd unicorn-hat/python/UnicornHat
and
sudo python setup.py install
or
\curl -sS get.pimoroni.com/unicornhat | bash
which will walk you through the full install.
Skywriter HAT
For the Skywriter HAT, you can either:
sudo pip install skywriter
or
git clone https://github.com/pimoroni/skywriter-hat
and then
cd skywriter-hat/python/library
and then
sudo python setup.py install
numpy
You’ll also need to install numpy by:
sudo pip install numpy
Connecting it all up
I’ll assume you’ve soldered the 40 pin headers to your BHHs. If not, get soldering, it takes a while.
You’ll want to plug your Unicorn HAT into one BHH and the Skywriter into the other.
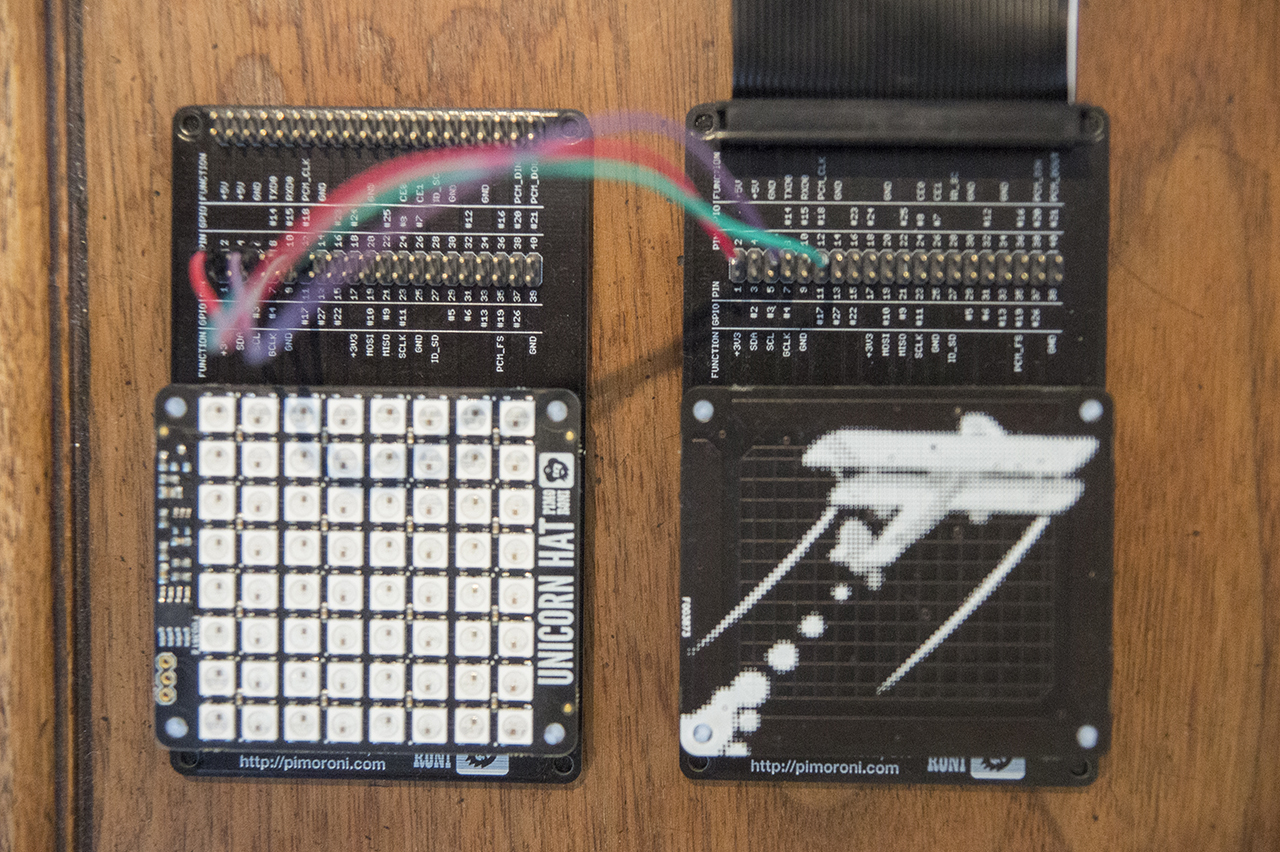
Since the Skywriter uses more pins than the Unicorn HAT (the Unicorn HAT uses just three), you’ll want to connect the BHH with the Skywriter on to your Raspberry Pi with the 40 pin ribbon cable that came with your BHH.
Next, you’ll need to connect three female-to-female jumper wires from the breakout pins on the BHH with the Skywriter on to either the input pins or breakout pins on the BHH with the Unicorn HAT on. The Unicorn HAT uses just the 5V pin (2 or 4), ground pin (6, 9, 14, 20, 25, 30, 34 or 39) and GPIO pin 18 (12).
EDIT: If you don’t have the Black HAT Hack3rs (you totally should) then you could just plug the jumper wires straight into the HATs, or you could mount them in breadboards using some male headers.
I’ve used pins 2, 6 and 12.
You’ll see how mine is connected up in the image below.
Before you go any further, it’s probably a good idea to test that your Unicorn HAT and your Skywriter HAT are both still working properly by running one of the example scripts for both.
How the blinking spot code works
A brief aside on how the blinking spot Python code works. You might find it interesting, you might not. If not, then skip over this section to the good bit.
In basic terms, it uses a 2D Gaussian to create a smooth falloff from the centre of the spot to the outer edge. A Gaussian, or normal, distribution is one of those bell-shaped curves that you’ve probably seen that are ubiquitous and describe the distribution of values like the heights of a population of adult humans. In two dimensions, a Gaussian distribution looks like the peak of a mountain.
The Python numpy library makes it simple to produce a matrix of values sampled from a 2D Gaussian that we can use to set the brightness of the LEDs on the Unicorn HAT. Here’s the function that creates that 8x8 matrix of values:
def make_gaussian(fwhm, x0, y0):
	x = np.arange(0, 8, 1, float)
	y = x[:, np.newaxis]
	fwhm = fwhm
	gauss = np.exp(-4 * np.log(2) * ((x - x0) ** 2 + (y - y0) ** 2) / fwhm ** 2)
	return gauss
The fwhm variable controls the width of the spot, smaller values making it
more focussed and larger values making it less focussed. The x0 and y0
variables set the centre coordinates of the spot within the 8x8 matrix.
The result is an 8x8 matrix of values between 0 and 1 that set the brightness
of the 64 LEDs. We can simply loop through the x and y values in the matrix and
set the brightness of the Unicorn HAT LEDs with those values. Adding another
loop to change the value of the fwhm variable allows us to blink the spot on
and off:
while True:
	x0, y0 = 3.5, 3.5
	for z in range(1, 5)[::-1] + range(1, 10):
		fwhm = 5/z
		gauss = make_gaussian(fwhm, x0, y0)
		for y in range(8):
			for x in range(8):
				h = 0.8
				s = 0.8
				v = gauss[x,y]
				rgb = colorsys.hsv_to_rgb(h, s, v)
				r = int(rgb[0] * 255.0)
				g = int(rgb[1] * 255.0)
				b = int(rgb[2] * 255.0)
				unicorn.set_pixel(x, y, r, g, b)
		unicorn.show()
		time.sleep(0.0005)
You can see the result in the GIF below.

Now all we have to do is add a little decorator function that allows us to use the positional information from the Skywriter to set the centre coordinates of the spot.
Adding in the Skywriter
There are just a couple more things to add to get all this working.
First, we need to add a decorator to our Unicorn HAT LED spot code to set the centre coordinates of the spot and, second, we need to put our code to make the spot into a function so that we can attach the decorator to it.
Oh, and we need to rotate the LED matrix 270 degrees (assuming that your BHHs are both sitting next to each other in the same orientation) so that the movements from the Skywriter match up with the orientation of the Unicorn HAT.
Here’s our new spot function with the Skywriter decorator:
@skywriter.move()
def spot(x, y, z):
        x0 = x * 7
        y0 = y * 7
        h = 0.8
        fwhm = 5.0
        gauss = make_gaussian(fwhm, x0, y0)
        for j in range(8):
                for i in range(8):
                        s = 0.8
                        v = gauss[i, j]
                        rgb = colorsys.hsv_to_rgb(h, s, v)
                        r = int(rgb[0] * 255.0)
                        g = int(rgb[1] * 255.0)
                        b = int(rgb[2] * 255.0)
                        unicorn.set_pixel(i, j, r, g, b)
        unicorn.show()
        time.sleep(0.0005)
The x, y and z passed to the spot function become values between
0 and 1 that correspond to the x, y and z coordinates in 3D space thanks
to our @skywriter.move() decorator.
The x0 = x * 7 and y0 = y * 7 lines convert our x and y coordinates to
values between 0 and 7 that we can use to set the centre position of the spot
on the 8x8 matrix.
The last thing is to add the following line towards the top of our program which will rotate the Unicorn HAT matrix 270 degrees:
unicorn.rotation(270)
You can download and run the script as follows:
git clone https://gist.github.com/db8d493085b39727d3b1.git
sudo python unicorn_skywriter.py
I hope you have fun with this. You could even try using the z coordinates from the Skywriter to control the hue of the spot.