You can find the full version of this tutorial here, but below are a few excerpts that describe briefly how to set it up and get it running.
8-bit shift registers are pretty cool little bits of kit (and cheap to boot)! They let you increase the number of output pins from three to eight, or even more if you daisy chain the shift register chips together.
Here’s what you’ll need:
- A Raspberry Pi A+/B+/2
- Pimoroni Explorer HAT/Explorer HAT Pro
- A mini breaboard
- An Explorer HAT Pro parts kit
Here’s the shift register demo in action:
Getting the software set up
If your Explorer HAT/Explorer HAT Pro isn’t set up yet, you’ll need to do the following:
curl get.pimoroni.com/i2c | bash
sudo apt-get install python-smbus
git clone https://github.com/sandyjmacdonald/explorer-hat.git
cd explorer-hat/library
sudo python setup.py install
Those commands will install set up I2C and install my fork of the Explorer HAT Python library.
Here’s my usual blurb about checking that everything is set up properly…
You’ll want to plug your Explorer HAT into the 40 pin GPIO connector on your Raspberry Pi. You can check it’s working by typing the following straight in the terminal:
sudo python -c 'import time, explorerhat; explorerhat.light.on(); time.sleep(1); explorerhat.light.off()'
That should light up all four of the LEDs on the Explorer HAT board for a second and then switch them all off again. If that works, then your Explorer HAT is good to go!
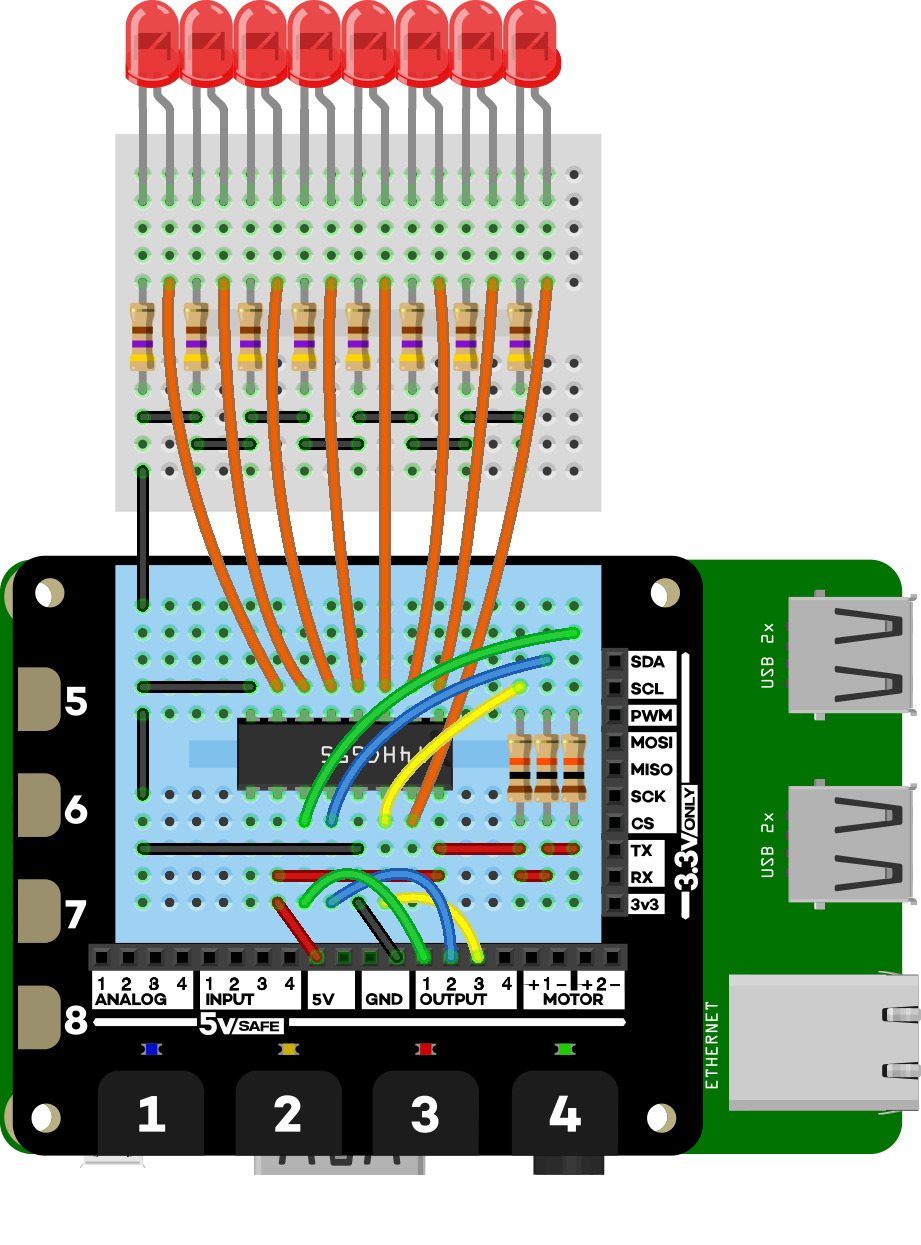
The wiring diagram
The wiring here takes a while and is a bit tricky, but hopefully I’ve made it neat enough that you can get it all set up and working in 15 to 20 minutes.

The code
I’ve created a new plugins module, in my fork of the Explorer HAT Python library, that
contains a ShiftRegister class with methods for toggling the pins on or off and a few
different patterns to use with LEDs. If you’ve followed the instructions above to clone
and install my fork of the Explorer HAT library, then you’ll already have the plugins
module and ShiftRegister class available to you.
You can start an interactive Python prompt by typing sudo python and pressing return
(the sudo is important as you need it to be able to interact properly with Explorer HAT).
Type the following to run a demo of the ShiftRegister class:
from explorerhat import plugins

shiftreg = plugins.ShiftRegister()
shiftreg.demo()
This should blink all 8 LEDs on and off 5 times, run along the line of LEDs 5 times, alternately blink the odd and even LEDs 5 times and run back and forth along the line of LEDs 5 times.
For lots of detail on how the code works, check out the full version of the tutorial here.
Taking it further
It’s possible to daisy-chain the 8-bit shift register chips together to drive even more LEDs from the same 3 output pins. You’d just connect up the last output pin of one chip to the serial input pin of the second chip and connect up the other two input pins, the storage register clock and the shift register clock, from the two chips, so that they switch on and off at the same time.