Slice is a Raspberry Pi compute module-powered media player. It’s made by Five Ninjas - who comprise a music producer, two of the Pimoroni directors, and two of the Raspberry Pi directors - and was launched on Kickstarter in August 2014. After a highly successful campaign, making almost a quarter of a million pounds, the Slice media players began shipping at the beginning of March.
“It feels lovely to the touch, not too rough, not too smooth.”
Mine arrived last weekend. I backed the £159 tier, a fully-loaded Slice fitted with a 1 TB hard disk, in the grey colour. I’ve had about a week now to set it all up and test it out, and I’ll try to give a thorough review of my experiences thus far.
Hardware design
Slice is housed in an anodised aluminium case that comes in three colours - black, grey and red - and measures 13 cm long by 10.6 cm wide by 3.2 cm tall. Sandwiched between the two halves of the aluminium case is a perspex diffuser layer to let the ring of contextual RGB LEDs shine through. The case is held together with four M3 hex screws that can easily be removed should you wish to delve inside. Four little rubber feet on the bottom of Slice stop it from sliding around and protect the bottom of the case from scratches.
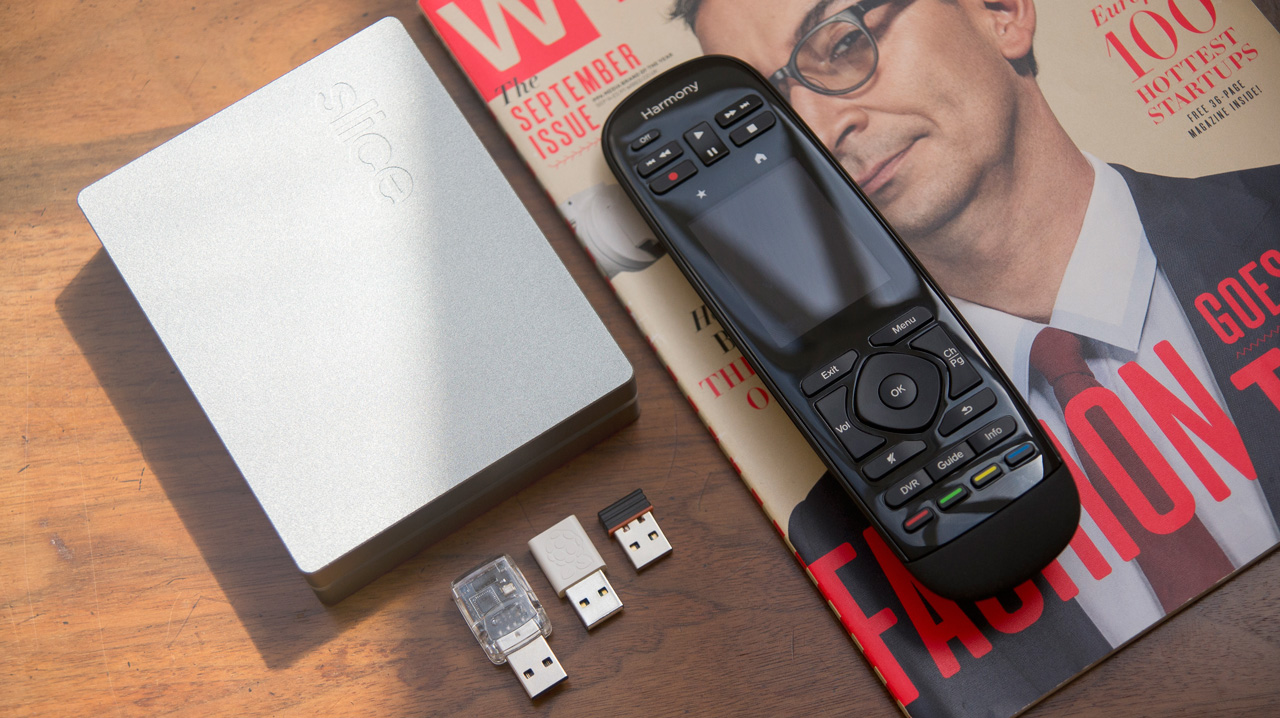
It feels lovely to the touch, not too rough, not too smooth. The whole thing has a nice weight to it as well, although I guess a significant part of that is the hard disk and it might feel a tad less hefty if you’re using it disk-less.
All of the IO is located on the back edge of the case. There is, from left to right, a 3.5 mm stereo audio (out) jack, a 10/100 ethernet port, three USB 2.0 ports, a micro USB port, HDMI out and a 5V power jack. The micro USB port allows you to connect Slice directly to your PC and mount it as an external hard disk to copy media across.
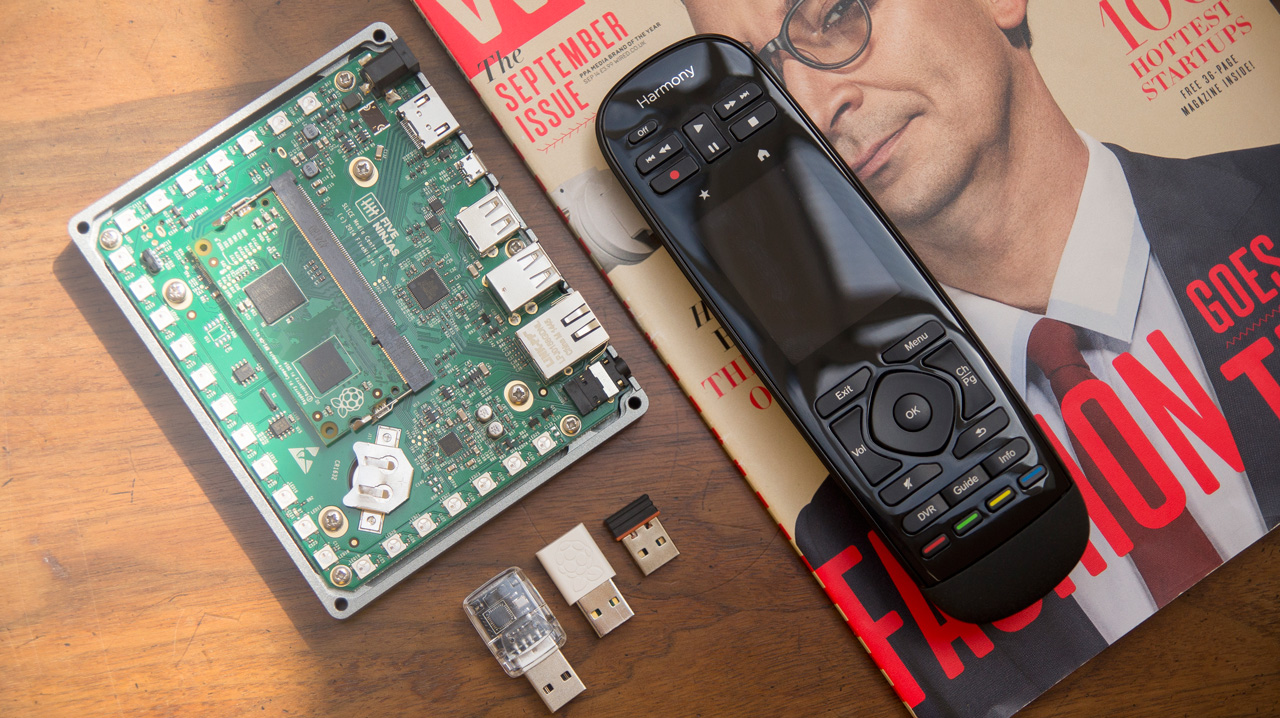
Inside Slice, there’s the PCB with Raspberry Pi compute module at its heart and the ring of 25 RGB LEDs around three of the edges. There’s also a coin cell battery that I presume is to power a real-time clock. On the rear of the PCB, underneath, is mounted the 2.5 inch SATA hard disk, a 1 TB one in my case.
User interface
Slice runs OpenElec and Kodi (FKA XBMC). It runs a custom skin, designed by Five Ninjas, that is clean and minimal enough to be easy to navigate and use, while also having plenty of additional functionality should you wish to dig in further. There are eight different themes included, that essentially just change the background image, as far as I can tell.
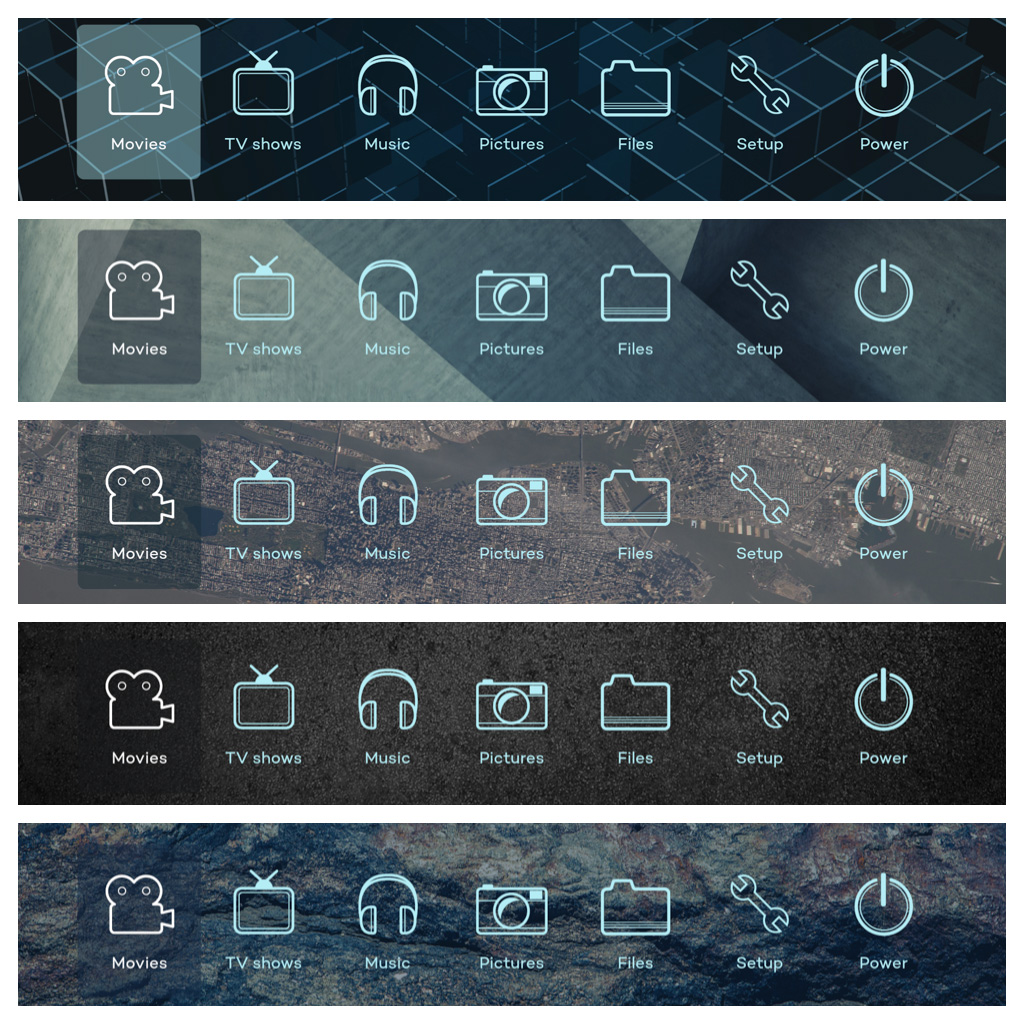
The home screen has seven icons: movies, TV shows, music, pictures, files, setup and power. Pretty self-explanatory really. As is the norm these days, the UI is pretty flat (no rich Corinthian leather in sight; no input from Scott Forstall) with little visual cruft. The only other UI elements on the home screen are the date and time along the bottom of the screen.
The movies, TV shows, music, pictures and files menus all operate similarly. Initially, you add a source containing all of your movies (or TV shows, or whatever), and then your movies appear in a list on the left hand side of the screen with cover art and details on the right hand side. All of these metadata are scraped when your add or update your sources. The TV shows menu operates similarly, except TV shows with multiple seasons are subdivided by season.
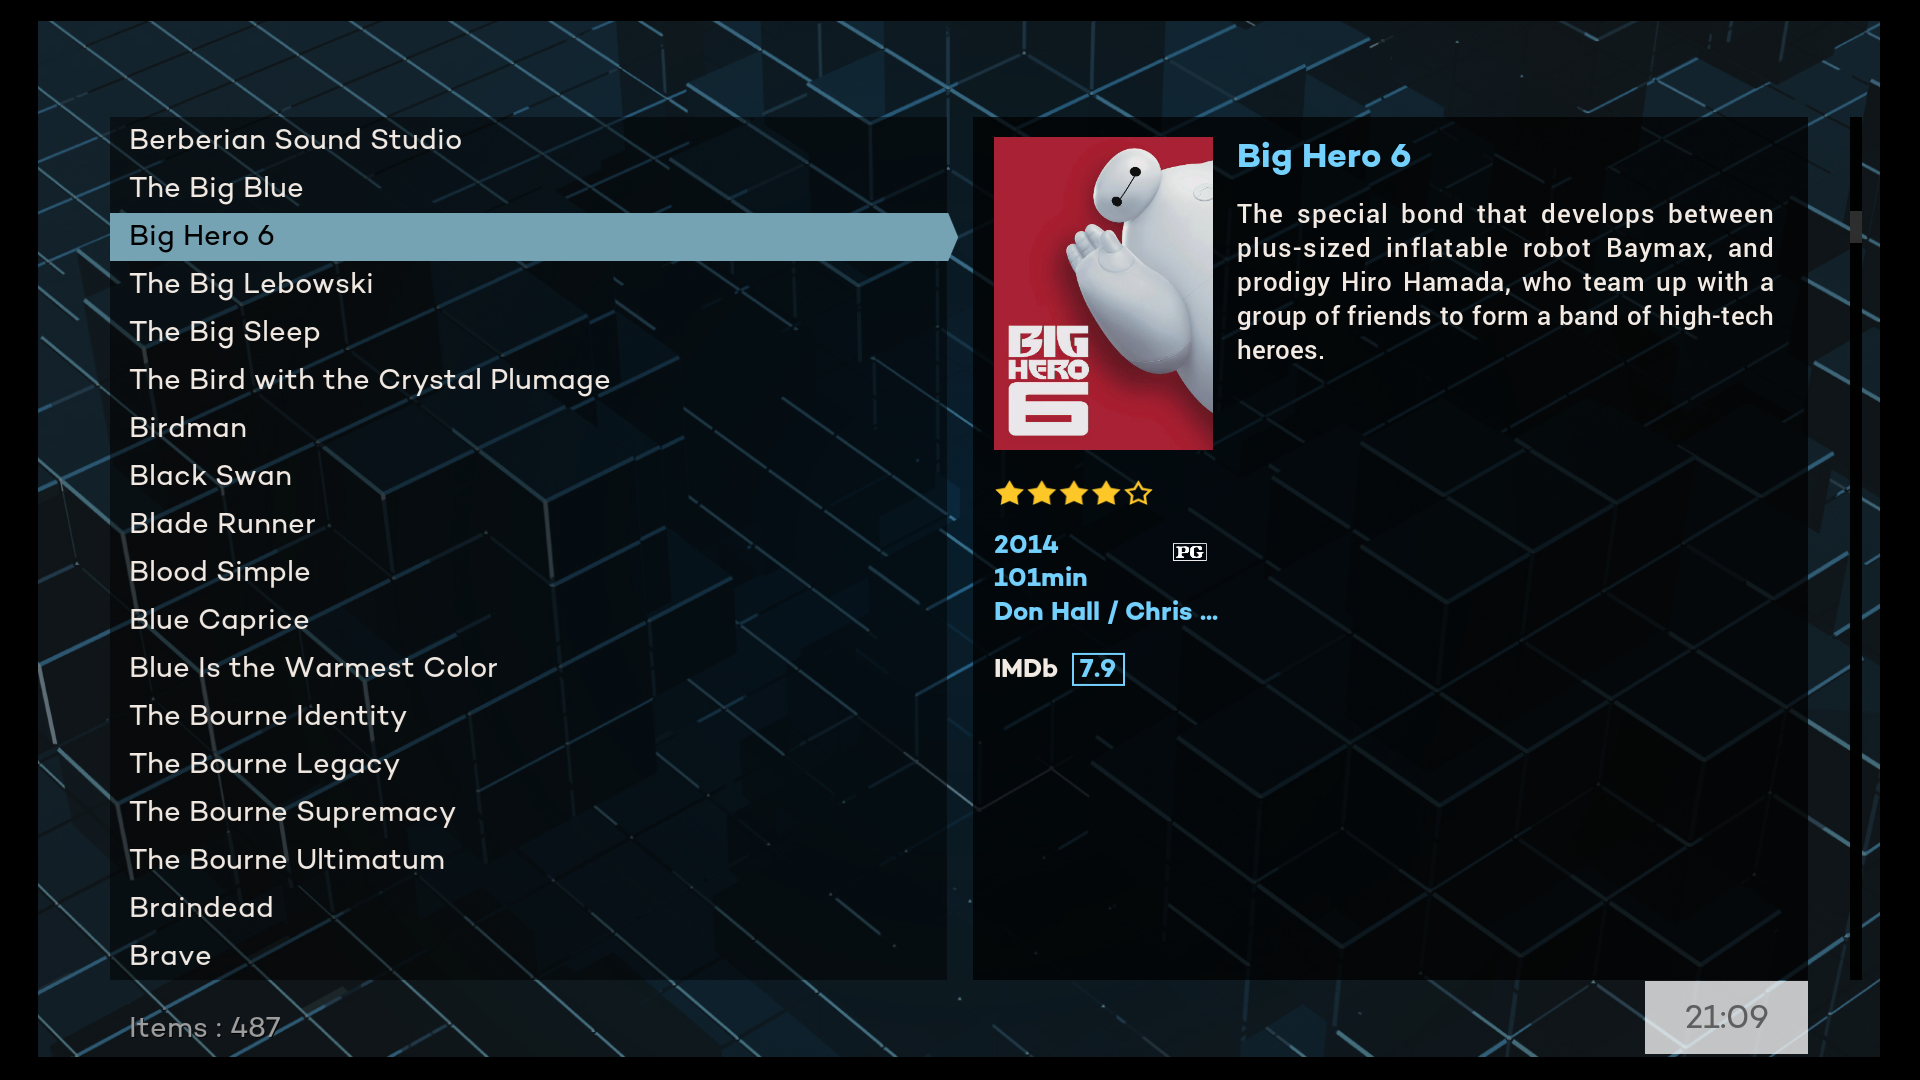
Pushing left brings up a sidebar menu on these movie, TV shows, etc. screens that has options for view, sorting, order, search, update library, favourites and browse files. There’s also the contextual menu button (the double cheeseburger icon on the remote) that allows you to queue items, play, add to favourites, get movie information, mark as watched or manage (edit, remove, etc.).
I won’t go into great detail here about the other two menus. The settings menu has sub-menus for add-ons, XBMC settings, OpenElec settings, file manager, system info and update library. There’s also a power menu that allows you to mute, power off, reboot or log off.
Set up
The OpenElec set up is really easy. You just set the language, hostname, connect to your network and enable SSH and/or Samba. Simple. The rest of the set up takes a little longer.
When you first get in, you’ll want to add some sources to the movies and TV shows menus. If you’re using the local storage on the hard disk, I’d suggest creating a series of folders for movies, TV shows, music and pictures when you’ve got Slice mounted as an external hard disk. This makes it easy to find these folders and add them as sources in the correct menus. If you’re using network attached storage, like I am, then you’ll have to add the NFS shared folders that contain your movies, TV shows, etc.
The first time that you do this, it’ll take a little time to scan all of your files and scrape all of the metadata. For my library, with almost 500 movies and about 50 TV shows, this only took about fifteen or twenty minutes.
As well as this main profile for all of my movies and TV shows on my Synology NAS, I set up a separate profile for the locally-stored files that I can use if I’m travelling or away from home.
I also tweaked the video and audio settings to suit my set up, and calibrated the screen - a necessary step, since some of the information along the bottom of the screen was cut off before calibration.
Using Slice
I have Slice hooked up (via HDMI) to my home cinema system: a Yamaha RX-V673 AV receiver with Monitor Audio MASS 5.1 surround speakers and a 42” LG TV. In short, the sound and picture quality are exceptional; easily as good as my Apple TV.
Sound quality is a big part of the overall experience with home cinema kit, and because Slice is capable of passing through the digital audio straight to your receiver, the sound quality is excellent right through the spectrum.
“I really love the contextual LEDs. They light up when you perform different actions like play, pause, skip, rewind/fast-forward and stop. They’re a handy extra visual cue to let you know when you interact with Slice, but mostly they just add a bit of bling.”
The picture quality is also great. Not much to say here really. Everything is very fluid, and in my week of use so far, I’ve had zero glitches.
As I said, I’m using my Synology NAS as the source for my movies and TV shows, and this is the only time that I’ve experienced any lag with Slice, when the hard disks are spinning up after sleeping. There’s a delay of a second or two before the movie starts playing, but once playing, skipping back and forth and pausing and playing are instantaneous. Obviously, Slice isn’t to blame here. Playing movies directly from the local storage really is instantaneous.
I really love the contextual LEDs. They light up when you perform different
actions like play, pause, skip, rewind/fast-forward and stop. They’re a handy
extra visual cue to let you know when you interact with Slice, but mostly they
just add a bit of bling. There’s an extra funky LED sequence that should play
on start-up, but this hasn’t been enabled yet. I’d love to see this added. If
you’re so inclined, it’s simple to tweak these LED sequences. The sequences
are just 25 pixel wide images that are scanned line-by-line from top to bottom
and the corresponding RGB values fed to each of the 25 LEDs. You can SSH in and
copy them across to your PC/Mac from the /storage/.kodi/media/ledpatterns
folder on Slice, edit them and then copy them back across. Restart your Slice
and bingo, they’ll be updated. I tweaked the levels on the play and pause
sequences because they weren’t quite bright enough for my liking.
The remote that’s included works perfectly. It’s an RF remote, so you have to plug a little USB dongle into the back of your Slice to get it to work. I believe there’s also an IR sensor on the PCB that could be enabled in future to allow IR remotes to be used. The remote is about the same size as one of the aluminium Apple TV remotes except made of sturdy plastic. It works just as expected, although it lacks a dedicated mute button or power on/off button.
I’ve actually set up my Harmony Ultimate remote to work with Slice by pairing it up with a FLIRC USB adaptor plugged into Slice. This works great and adds functions like dedicated mute and even a screenshot function (you can get these if you plug a USB keyboard into your Slice). The real power is being able to ditch that extra remote and control everything from a single remote. If you’re thinking of going down this route then I’d suggest following these instructions.
Almost perfect
I really like Slice. The hardware is great. The only thing I’d like to see change would be the typeface used for the Slice logo on top of the aluminium case; I’m not keen on it, it’s a bit too rounded for my liking.
“All that’s left to say is that I’d highly recommend Slice to anyone wanting an all-singing, all-dancing media player that looks great and works really well.”
As far as the software goes, again, I think it’s great. I’d like to see some more themes added, and some instructions on how to add your own themes if you’d like to use your own background image or change the typeface. There are a couple of tiny details that I think aren’t quite right, like the time on the bottom right hand side of the home screen being in bold and the date on the left hand side not being bold, and the different look of the time when you’re in a menu. There’s also an issue with the (lack of) contrast of the icons when using the wood theme. But I’m being really nitpick-y, and none of these will affect your enjoyment of Slice.
Of course, it’s early days, and Slice hasn’t even had a public launch yet, so I’m sure a lot of these details will be ironed out soon.
All that’s left to say is that I’d highly recommend Slice to anyone wanting an all-singing, all-dancing media player that looks great and works really well. You can pre-order a Slice here if you missed out on the Kickstarter.